Pages

Saturday, April 27, 2019

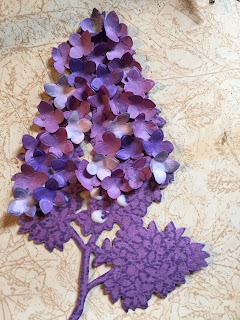
for a long time I have been looking for a lilac die that I could use to make things for my mother because the lilac is her favorite. So when I saw this Sheena Douglass set on HSN I had to order it and give it a try.


I have never used perfect partners or companions stamps and dies before so off to the crafter's companion web site i went because there are no instructions included. 

I have a bigshot so to cut out the images the web site said I should build my sandwich as follows to cut.    1) multi purpose platform ( all tabs)
          2) cutting mat
          3) die
          4) card stock 
          5) cutting mat 
The first thing I noticed is that if I am only doing one layer of paper the die gets stuck in the cutting plate. I can cut up to 3 layers of card stock to prevent this from happening and that will make things go much faster too. I cut 3 different shades of purple for my first branch. I then inked the lighter shade on the edges and cupped the flowers up with the a ball shaping tool and glued them onto the branch. I found that my wax pen works great for picking up those little flowers.

I then made a twisted easel card

this is just a 10inch by 5 in card scored at 5inches the diagonally from top corner to middle corner

 
          fold on score lines

I cut out 2 scalloped circles 1 @ 5.5 and one at 5inches
and a triangle 6.5 x 4.5 and a 4.5 inch square


I painted all the smaller pieces and outlined the larger ones with black marker, added a butterfly from crafter's companion butterfly dimensional set which I painted with metallic acrylics, added my lilacs and this is what I ended up with 


It was a lot of fun and I like the way it came out. I will be doing more of these for sure.


Monday, April 11, 2016

paper flower arrangements

Spring is taking forever to get here this year. So lately I have been working on paper flower arrangements. The more I do them the more I enjoy it! I even got a few orders for Easter and a few more for mothers day. I love making these and it was a boost to my ego that people would pay me to do something I love. Here are a few of my first attempts.


Saturday, January 23, 2016

shadowbox card

Here is another shadowbox I made, I am really getting into making these, they are so much fun and with cricut design space you can upload any non copyrighted object to put in it. I used a unicorn silhouette that I found in a quick google search. I uploaded it to ds and the weeded out the back ground. To make the second unicorn I just mirror imaged the first and flipped it around. easy peasy :D Give it a try... here is the link to a square frame shadowbox I made. Please share what you make with it, I would love to see!

Thursday, January 21, 2016

fairy shadow box card

Today I was playing in design space and put together this cute little shadow box card. My favorite thing about design space has to be how all of my images are at my fingertips so I can mix ans match. The fairies for this card came from Denise's scrapbooking room and can be found here. The flowers and vine are from the Art Nouveau cartridge which I bought years ago when it first came out and use all the time ( I love the fonts). I got the mason jar from SVGcuts and it can be found here. I designed the box itself from basic shapes and eyeballed the score lines. As i was working on this one the ideas were flooding in, the possibilities are endless.


Friday, January 15, 2016

Diaper cakes

Today I made my first castle diaper cakes. They use 70 diapers, I used both newborn and size one but they could have been any size. This was a fun project that went together easily and no baby shower is complete without a diaper cake!


These are just the basic cakes, I will re-post next week when I have added all the cuteness to them :)

Wednesday, January 6, 2016

3D babybottle

               Today I made this 3D baby bottle from the Tiny Miracle SVG Kit. It was a fun project. The only problem that I found was that Mary in the tutorial is so awesome that she makes it look so easy and makes me feel like I have 11 fingers while gluing, hehehe. She uses scotch adhesive and I found that the Aleene's original tacky glue worked better for me. This was a fun project and I will definitely make more of them. I am going to use them as center pieces for baby shower decorations and fill them with candy. they can be used as prizes for the games at the shower.


Tuesday, January 5, 2016

Crib Box Card for Baby

I have several friends who are having babies so today I am working on cards for them. I bought this super cute file from SVG cuts.


 I had never worked with their files before but they had a great tutorial video and the pdf that came with the file was helpful. Because I am new to cricut design space it did take me some time to figure out that I had to attach the score lines to the card to get them to cut but I love the way it came out. I did change a couple things on this one, I used an owl from the CTMH artbooking cartridge instead of the teddy bear because she is doing an owl theme. I also left out the blocks that spelled out BABY because I could not get the Y to cut without tearing. I cut the safety pin off the front and used it on the back along with the booties.


this is the back. 

I ended up getting carried away and made 4 of them


here is a closer look at the boy one


I was still having trouble with the Y on the blocks but really wanted to add it, so edited the blocks to write in design space instead of cut and then I colored them in and fussy cut them out.
I am happy with the way they turned out.


Friday, December 18, 2015

For today's project I wanted to play along with KBD challenges on facebook. The challenge was to create a winter scene using any KaDoodle Bug Design as the focal point. The prize is a free KBD file of your choice ( a GREAT prize!!) I made this shaker card.


I used the Trimming The Tree by KaDoodle Bug Designs for the penguin, the tree and all the ornaments. Is he cute or what?!?! I cut them out in the original size. For the globe itself I used one of Bird's free Christmas files Snowglobe Digital Cutting File by Bird . I re sized the globe to be 10.93 so that I could fit everything inside. I cut 2 of the inner rings out of foam paper and glued them together so my snowflakes would have room to move. I used the plastic from an old cricut mat for the front and a snow flake punch for the snowflakes. I punched some of the snowflakes out of glitter paper and some out of plain white. This was so much fun to make and I think I will play along with this group when ever I have the time.

Wednesday, December 9, 2015

Denim Christmas Stocking

           I know it has been a long time since I have posted anything. I just had a baby and things have been a little crazy around here. I have been crafting just have not had time to make a post. Today while the baby was napping I decided to add to my stocking collection by making one of my own.

            I traced one of my already made stockings and then added 1/4 of an inch for the seam allowance. For the other side I flipped the material over and did the same. Then I sewed the two sides together with my sewing machine. I hot glued the pocket on ( the baby woke up and I was in a hurry to finish up) you could hand sew it if you want. I then folded the top down and hand sewed a belt loop to hand it from.

Tuesday, September 9, 2014

fast and furious slider card

for this card I stamped the truck from the fast and furious stamp set in honey ink and fussy cut it out. I cut the tires from the scalloped circle on art philosophy but next time will just stamp them in black and cut them out because I had to stamp them for the hub caps anyway. I marked 3/4 inch from the bottom of the card and 1 inch on both sides and half inch from the bottom mark, then used my paper trimmer to cut out the run. The pull tab is a 6 3/4 long 3/4 inch wide piece of scrap stamped in cranberry ink. I used 3d foam tape along the top and bottom of the track and glued a piece of 4 1/4 x 5 1/2in card stock on the inside panel. I then put the pull tab between the two fronts into the “pocket” that was created using the foam tape and pop dotted the truck to the tab.

015

016

017

Wednesday, August 20, 2014

Think positive Challenge

There is a challenge going around where we are asked to post 3 positive things we are thankful for 7 days. Because I live with Bipolar disorder I try to do a daily evaluation everyday to find the positive so that I do not become overtaken by the depression. I decided that I would not only do this challenge on my facebook but also wanted to share today's post here on my blog.  #1- I am thankful for my husband , who is a great father, a great listener, a great provider, my best friend. He is my partner, he makes me smile when I am down. He is supportive and kind and helpful. He is a hard worker. He never leaves in the morning without telling me he loves me. He helps me to see things from another prospective. We do not always agree but our differences in opinion about some things make us better parents and make our family unit stronger. I am thankful for everything he is and everything we are together #2- I am thankful for our home. I love waking up and being able to sit on the deck with my morning coffee, listening to the roosters crowing and the birds chirping, I am thankful to be in the mountains and far from the hustle and bustle and stresses of city life. I am thankful for people who love the city life but I am not one of them. #3-.is my mom, I am thankful for everything that has to do with my mom. She taught us family values, that family comes first and that no matter what we are there for each other, family members mess up and sometimes let us down but they also lift us up and show us what is truly important in life. She taught us that sometimes people make mistakes, she taught us that no one is perfect, she taught us that everyone has their own reasons for the things they do and to try to see it from their point of view even if we do not agree with them. My mom is always available for me to talk to, to share the happy and the sad and anger, the fears and my dreams with. I am thankful for the strength she gives me just by listening. I am not going to nominate anyone else for this challenge but instead ask all my friends to reflect on what they are thankful for not everyday for 7 days but everyday that they open their eyes. There is so much pain and hurt and hate in this world that really thinking everyday about the positive things can help to get through the negative.

030   this picture was taken at Long Pond just around the corner from my home and it is my positive picture for today Smile

Thursday, August 7, 2014

Chalk it up

As always this time of year my thoughts are on the children going back to school and planning what I will do with those "first day" photos. Check out these cute layouts made with the chalk it up paper pack. There is no stamping on either of these layouts just the paper pack and the Complements and Assortments that go with the paper pack. HOW EASY IS THAT?!?!?!
14-ai-chalk-it-up-level-2-02
12" x 12" You Amaze Me Layout
X7184B Chalk It Up Paper Packet
Magic: Secret™
 
X7184C Chalk It Up Complements
Z3009 Chalk It Up Assortment
Z2205 Black Exclusive Inks™ Re-inker
 
14-ai-chalk-it-up-level-2-01
12" x 12" School Year Layout
Make It from Your Heart™ Vol. 2: Pattern 7
X7184B Chalk It Up Paper Packet
X7184C Chalk It Up Complements
Z3009 Chalk It Up Assortment
Z1935 Black & Grey Epoxy Bubbles


Wednesday, August 6, 2014

10 pack of scrapbook memory protectors for only 3$

During the month of August, when you purchase any of the 13 available Picture My Life™ scrapbooking programs featured in the 2014–2015 Annual Inspirations idea book at their full retail price of $24.95 USD / $27.50 CAD, you are eligible to add your choice of 1 of 8 qualifying Memory Protectors™ 10-packs for just $3 (USD & CAD)! Each Picture My Life scrapbooking program already includes a coordinating 10-pack of Memory Protectors, so when you add your additional 10-pack for only $3 you will be well on your way to your own picture-perfect pocket scrapbooking adventure!

August 14
                   
               Avonlea                                                                    Babycakes                                                                                                                                                                                                                                          
14-ss-pml-avonlea          14-ss-pml-babycakes


          Later Sk8r                                                            Surf’s Up
  14-ss-pml-later-sk8r  14-ss-pml-surfs-up

                    Skylark                                                Balloon Ride                                                                                                                                                                             
14-ss-pml-skylark  14-ss-pml-balloonride


               Chantilly                                                                  Pear & Partridge
14-ss-pml-chantilly  pear & partridge

 Chalk It Up
                                                                                                         Laughing Lola
chalk t up 14-ss-pml-laughing-lola

                          Wanderful                                               Seaside                                                            
wanderful  seaside 


                   For Always
for always

Picture My Life™ scrapbooking programs

box card

so I needed a Birthday card and I have been wanting to make one of these box card since I first saw them on pintrest.

I used black card stock for the base because I knew I wanted to use the Laughing Lola paper and have found that I love the way the Laughing Lola looks with black

006

the Laughing Lola was one of the paper packs that was retired but I have some kits left to make these if you are interested contact me Smile

Saturday, April 26, 2014

Creatively Redeeming Treasures Team Blog Hop --April

Welcome to the Creatively Redeeming Treasures Team Blog Hop. If you are coming from Elizabeth’s blog  you are in the right place.


creatively-redeeming-team_bloghop_logo


We had an “anything goes” theme this month which gave me the perfect opportunity to make this card, I left off the sentiment for now so that I have a card on hand to use when I am short on time and need one in a hurry Winking smile

trifold 011


I used my petite perks stamp set to make it. I also used Gypsy and Lagoon ink and the back ground is done with one of the stamps from my skylark workshop on the go kits. I love the work shop on the go because you can use the stamps from them over and over again.


Now hop on over the Helen’s blog and see what she has created for us